VB Migration Partner requires that Microsoft Visual Studio 2005 or Visual Studio 2008 be installed on the local computer. We recommend that you run the migration process on the same computer where you developed and tested the original VB6 application, therefore also Visual Basic 6 must be installed on the local computer.
VB Migration PartnerはローカルコンピュータにMicrosoft Visual Studio 2005またはVisual Studio 2008がインストールされている必要があります。オリジナルVB6アプリケーションを開発やテストしていた同じコンピュータ上に変換プロセスを行うことをお勧めします。その為には、Visual Basic 6がローカルコンピュータにインストールされていなければなりません。
Using the program is quite simple and revolves around a few simple actions that can be reached from the toolbar.
このプログラムを使用するのはとても簡単で、シンプルなアクションを考慮されています。それらはツールバーから利用することができます。

Select the File-Open menu command or click the Open toolbar button to load a VB6 project (.vbp) or project group (.vbg). If the project was written with a version of VB6 prior to VB6 you must convert it to VB6 before attempting the conversion. If the loaded file isn’t recognized as a VB6 project or project group a message error is displayed.
「Fileメニュー Open」を実行するか、もしくはツールバーの「Open」ボタンをクリックしてVB6プロジェクト(.vbp)またはプロジェクトグループ(.vbg)を選択してください。もし対象のプロジェクトがVB6以前のVersionで書かれている場合、変換を試す前にVB6へVersionUpしておく必要があります。読み込まれたファイルがVB6プロジェクトもしくはプロジェクトグループとして認識されない場合、メッセージエラーが表示されます。
If the EXE or DLL file created by compiling the VB6 project is present, VB Migration Partner compares its datetime stamp with the datetime stamp of all the files in the project. If the executable file is older than any of the corresponding source files, VB Migration Partner displays a warning.
VB6プロジェクトによるコンパイルされたEXEやDLLファイルがあれば、VB Migration Partnerはプロジェクト内の全てのファイルのDateTimeスタンプを比較します。もし実行ファイルが対応するSourceファイルより古い場合は、VB Migration Partnerは警告を表示します。
Warning: We strongly recommend that you always recompile the original VB6 project before attempting the conversion to VB.NET and ensure that the VB6 code doesn’t contain syntax errors. While VB Migration Partner is able to spot such errors and solve them in most cases, in some cases these errors might cause invalid VB.NET code to be emitted and even crash VB Migration Partner.
警告:VB.NETに変換を試みる前に、オリジナルのVB6プロジェクトをリコンパイルし、構文エラーがないことをまず確認してから変換を行うことを強く推奨します。VB Migration Partnerがそのようなエラーを見つけられる間は、ほとんどのケースを解決できますが、いくつかのケースにおいてはこれらのエラーは無効なVB.NETコードが放出し、VB Migration Partnerをクラッシュさせるかもしれません。
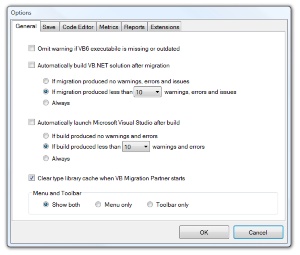
Note: you can suppress the display of this message box by selecting the corresponding option in the General tab of the Tools-Options window.
注記:このメッセージボックスの表示については、「Toolsメニュー Options」ウインドウの「General」タブにある対応したオプションを選択することによって表示を制御することができます。
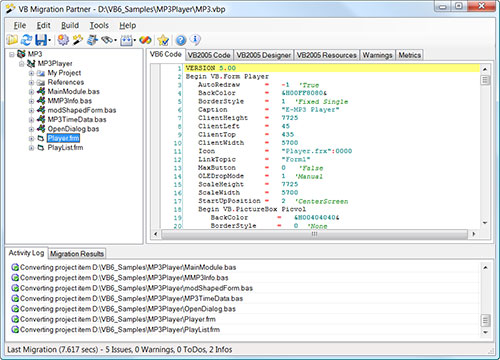
Select the Build-Convert to VB.NET menu command or click the Convert toolbar button to start the conversion process. Each source file undergoes three distinct migration stages: the parsing stage, the processing stage, and the conversion stage. During the process an activity log is created, so that you can watch which files are being converted.
変換プロセスを始めるために、「Buildメニュー Convert to VB.NET」を実行するか、ツールバーの「Convert」ボタンをクリックしてください。それぞれのソースファイルは3つの異なった段階を経ます。解析段階、処理段階、変換段階です。アクティビティログが作成されている処理の間は、どのファイルが変化されているのか見ることができます。
When the migration process is over, a few new tabs appear in the rightmost pane of VB Migration Partner’s main window:
変換作業が終了した際に、VB Migration Partnerのメインウィンドウの一番右枠にいくつかのタブが表示されます。
- the VB.NET Code tab shows how the code in the currently selected file has been migrated
VB.NET Codeタブは現在選択されているファイルのコードがどのように変換されたかを表示します。
- the Warnings tab shows all the warnings and issues for the entire project or file that is currently selected
Warningsタブは現在選択されている全体プロジェクトもしくはファイルの全ての警告と問題を表示します。
- the Metrics tab shows code statistics for the entire project or file that is currently selected
Metricsタブは現在選択されている全体プロジェクトもしくはファイルのコード統計を表示します。
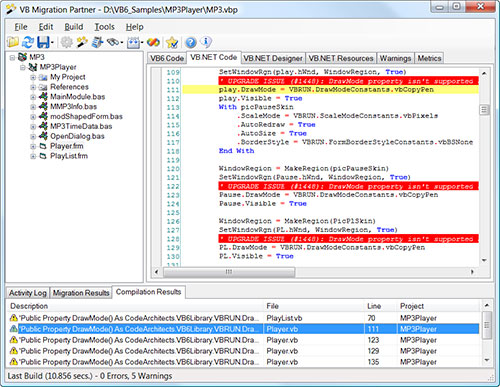
The Migration Result pane displays the list of all the issues, warnings, info, and to-do messages that have been emitted as special remarks in the VB.NET code. You can filter these messages by clicking on one of the four tabs at the top of this pane and you can double-click a message to quickly jump to the code portion where the message has been emitted.
Migration Results枠はVB.NETコードの特記事項として出力され「Issues」、「Warnings」、「ToDos」、「Information」としてリスト表示されます。この枠の上部にある4つのタブのひとつをクリックすることによって、これらのメッセージをフィルタすることができます。そしてそのメッセージをダブルクリックすることで、そのメッセージが作成されたコード箇所にダイレクトにジャンプします。
Select the Build-Compile Entire Solution menu command or click the Compile toolbar button to compile all the projects in the current solution to VB.NET without leaving VB Migration Partner. You can also compile individual projects, by means of the Build-Compile Selected Project menu command.
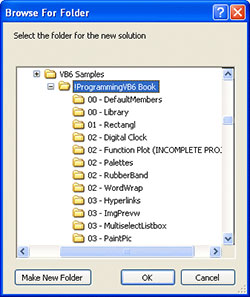
「Buildメニュー Compile Entire Solution」を実行するか、ツールバーの「Compile」ボタンをクリックしてください。現在のSolutionの全てのプロジェクトをVB.NETにVB Migration Partnerを離れることなくコンパイルできます。また個々のプロジェクトを「Build メニュー Compile Selected Project」を実行することでコンパイルすることもできます。 Before running the actual compilation, VB Migration Partner has to save VB.NET source code files to disk. By default, these files are stored in a folder in the same directory as the folder that contains the original VB6 project; the name of the new folder is obtained by appending “_NET” to the name of the original folder. You can modify such default behavior in the Save tab of the Tools-Options dialog.
実際のコンパイルを実行する前に、VB Migration PartnerはVB.NETのソースコードファイルをディスクに保存する必要があります。デフォルトでは、オリジナルのVB6プロジェクトが格納されているフォルダと同じ場所のフォルダに格納されます。新しいフォルダの名前はオリジナルフォルダ名に“_NET”を追加することによって決まります。「Tools メニュー Options」を実行したダイアログの「Save」タブの中でそのようなデフォルトの動作を変更することができます。
Before proceeding, VB Migration Partner displays a dialog that allows you to select a different directory:
作業の前に、VB Migration Partnerは異なるディレクトリを選択できるダイアログを表示します。
If the target directory already exists and contains files – presumably created by a previous migration attempt – VB Migration Partner displays a message box that asks you to confirm the selection.
ターゲットディレクトリが既に存在しファイルが含まれている場合は、恐らく過去に移行していることが考えられます。その場合、VB Migration Partnerは選択したフォルダの場所を確認依頼するメッセージボックスを表示します。
If the default choice is OK, you can tell VB Migration Partner not to display the dialog by enabling the Automatically Select Output Folder For VB.NET Solutions option, in the Tools-Options window. Likewise, you tell VB Migration Partner not to display the message box by enabling the Automatically Overwrite Existing Output Folder option, in the same window.
デフォルト選択でOKな場合は「Tools メニュー Options」を実行したダイアログの「Save」タブ内の「Options」枠、「Automatically select output folder for VB.NET solutions」チェックボックスを有効にすることによってダイアログを表示させないこともできます。同様にVB Migration Partnerに同じウィンドウ内にある「Automatically overwrite existing output folder」チェックボックスを有効にすることによって、メッセージボックスを表示させないこともできます。
Once the compilation process is completed, you can browse all the errors and warnings from the VB.NET compiler in the Compilation Results pane, near the bottom border.
コンパイルプロセスが完了した際には表示下部にある「Compilation Results」枠内にVB.NETコンパイラからの全ての警告とエラーを参照することができます。
Note: the compilation process is optional, especially when migrating a simple VB6 project or a project that you have already migrated previously and that has been already fixed to avoid compilation errors. In such cases you can directly load the converted code in Microsoft Visual Studio.
注記:コンパイル処理はオプションです。特に簡単なVB6プロジェクト移行している時、または既に以前移行したコンパイルエラーを修正済のプロジェクトの場合は有効です。そのようなケースにおいては変換されたコードをMicrosoft Visual Studioにダイレクトに読み込むことができます。
Alternatively, you can direct VB Migration Partner to compile the VB.NET code immediately after the migration process, by means of the Automatically Build VB.NET Solution After Migration option, in the Tools-Option window. You have the option to compile unconditionally or only if the conversion process generated fewer errors, warnings, and issues than a threshold that you specify.
また別の方法としては、「Tools メニュー Options」を実行したダイアログの「General」タブ内の「Automatically build for VB.NET solution after migration」チェックボックスを有効にすることによって、変換作業直後にVB.NETコードをコンパイルするようにVB Migration Partnerに指示することができます。また無条件にコンパイルするように設定したり、変換プロセスにおいて自身が設定した閾値より下回った警告、エラー、問題数の場合にのみコンパイルするように設定することもできます。
Except for trivial applications, you never come up with a working VB.NET application at the first attempt. Migrating VB6 code to the .NET Framework platform is better described as an iterative process: you are expected to go back to the original application, edit it to fix all the migration and compilation errors and issues, and convert the code once again. This is the so-called convert-test-fix cycle.
小規模のアプリケーション以外では変換後の最初の試みにおいて、VB.NETアプリケーションとして変換前と同様に動作することはあまりありません。VB6コードを.NET Framwork Platformに変換することは、以下に示す繰り返し行うプロセスがより適していると言われています。全てのコードの移行とコンパイルエラーと問題を修正し、再びコードを変換する作業をすることによって、オリジナルのアプリケーションに戻ることを期待します。この一連の作業を「convert-test-fix」サイクルと呼びます。
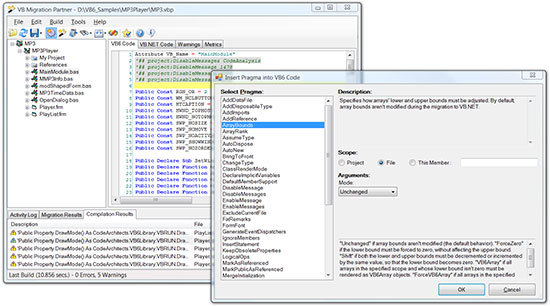
If the converted application has one or more compilation errors you should probably insert one or more pragmas in the original VB6 code. You can do so by selecting the VB6 Code tab and the Edit-Insert Pragma menu command or by clicking on the Insert Pragma toolbar button. This action displays the Insert Pragmas dialog, which assists you in picking up the right pragma and assigning the right arguments. When you click the OK button, the dialog is closed and the actual pragma is inserted at the current position in the VB6 code.
もし変換されたアプリケーションがひとつもしくはそれ以上のコンパイルエラーがあるならば、恐らくひとつもしくはそれ以上のPragmasをオリジナルのVB6コードに追加すべきです。VB6 Codeタブを選択し「Edit メニュー Insert Pragma」を実行するかツールバーの「Insert Migration Pragma」ボタンをクリックすることで実行できます。この動作はInsert Pragmasダイアログを表示し、適切なPragmaを見つけ、そして適切な引数を割り当てるように補助します。OKボタンをクリックするとダイアログが消え、VB6コードの現在の位置に実際のPragmaが挿入されます。

If you have added one or more pragmas, or have modified the original VB6 code in any way from inside VB Migration Partner, you should now save the new files to disk, by selecting the File-Save-Save VB6 Files menu command or by clicking on the Save toolbar button.
ひとつもしくはそれ以上のPragmaを追加または、VB Migration PartnerよりオリジナルのVB6コードを修正したことがある場合は、「File メニュー Save の Save VB6 Files」を実行するかツールバーの「Save」ボタンをクリックし新しいファイルをディスクに保存してください。

Alternatively, if you have modified the original VB6 code from outside VB Migration Partner – For example, from inside Microsoft Visual Basic 6 IDE or from an external editor – you can reload the project or project group by selecting the File-Reload menu command or by clicking on the Reload toolbar button.
別な方法として、VB6のオリジナルコードをVB Migration Partnerの外部より修正したことがある場合、たとえばMicrosoft Visual Basic 6 IDEもしくは外部エディタからの修正は、「File メニュー Reload」を実行するかツールバーの「Reload」ボタンをクリックしProjectもしくはProject Groupを読み込むことができます。
2.5 Launching Visual Studio/VisualStudioの起動

When you are satisfied of the results from the migration process you can load the converted VB.NET solution inside Microsoft Visual Studio, by selecting the Tools-Run Microsoft Visual Studio menu command or by clicking the Load the generated VB.NET code in Microsoft Visual Studio toolbar button.
Migrationプロセスの結果に問題がなければ、「Tools メニュー Run Microsoft Visual Studio」を実行するかツールバーの「Load the generated VB.NET code in Microsoft Visual Studio」ボタンをクリックし、変換されたVB.NET SolutionをMicrosoft Visual Studioに読み込むことができます。
VB Migration Partner displays the dialog box that allows you to select the target folder – as for the Compile to VB.NET command – then it launches Microsoft Visual Studio and loads the converted VB.NET in it.
VB Migration PartnerはVB.NETにコンパイルするためのコマンドとして、対象のフォルダを選択するようにダイアログボックスを表示します。その後、Microsoft Visual Studioを起動し、変換されたVB.NETを読み込みます。
The first thing to do at this point is checking all the errors and warnings in Visual Studio’s Error List window, and then all the items in the Task List window.
この時点で最初にすることは、Visual StudioのError Listウィンドウにすべてのエラーと警告をチェックすることと、Task Listウィンドウにすべてのアイテムがあることをチェックします。
VB Migration Partner can generate for different type of comments in the converted application:
VB Migration Partnerは変換されたアプリケーションに異なるタイプのコメントを生成することができます。
- UPGRADE_ISSUE: serious migration issues that you should solve immediately
- UPGRADE_ISSUE: 速やかに改善すべき深刻な移行問題点。
- UPGRADE_WARNING: migration warnings that might or might not affect the converted application
- UPGRADE_WARNING: 変換されたアプリケーションとして、影響があるかどうかわからない移行の警告。
- UPGRADE_TODO: suggestions about how to manually edit the migrated code to avoid a potential problem
- UPGRADE_TODO: 潜在的な問題を回避するために、手動でコードを編集することを提案。
- UPGRADE_INFO: information about the generated VB.NET code, including information about unused constant and methods and recommendations about the .NET type or methods that can replace a Declare statement.
UPGRADE_INFO: 生成したVB.NETコードについての情報。使用されていない定数やメソッド、宣言文に置き換えることができる.NETの型やメソッドについての提案。
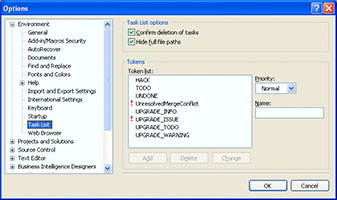
By default, only warnings and to-do comments appear in Visual Studio’s Task List pane. We suggest that you use the Tools-Options command to add the UPGRADE_ISSUE comment to the list of comments that the Task List recognizes and set its importance to High.
デフォルトでは警告とToDoコメントのみVisual Studioのタスク一覧画面に表示されます。.NETの「ツール メニュー オプション」を実行し、「UPGRADE_ISSUE」コメントをコメントリストに追加し、タスク一覧が認識できるように優先順位を「高」にしてセットすることをお勧めします。
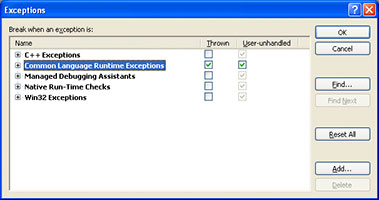
If there are no compilation errors you can run the VB.NET application and see how it behaves. It’s unlikely that a complex application runs smoothly at the first attempt, therefore be prepared for runtime exceptions. We recommend that you enable the option Break When An Exception Is Thrown in the Debug-Exceptions dialog box, so that you immediately catch unexpected runtime errors that would go unnoticed because of an On Error statement.
コンパイルエラーがなければ、VB.NETアプリケーションを実行し、どのように動作しているか見ることができます。複雑なアプリケーションにおいては最初の起動でスムーズにいくことはあまりありませんのでランタイムエラーが起こることを想定しておいてください。「デバッグ メニュー 例外」を実行し、ダイアログボックスのCommon Language Runtime Exceptionsの「スローされるとき」チェックボックスを有効にすることをお勧めします。その設定により、On Error Statementによる気がつかない、予期せぬランタイムエラーが起こった際にすばやくキャッチすることができます。
2.6 Using code analysis features/コード分析機能を使用
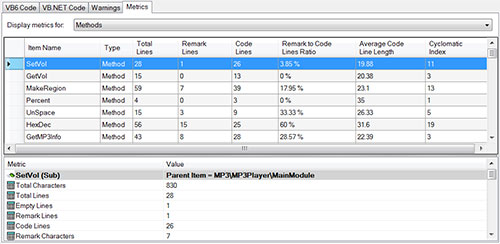
At the end of the conversion process VB Migration Partner displays a detailed report in the Metrics tab in the right portion of the main window.
変換プロセスの終わりにVB Migration Partnerはメインウィンドウの右側にある「Metrics」タブの中に詳細なレポートを表示します。
- Select an item in the tree on the left, to display code metrics at the solution, project, or file level.
- Solution、Project、またはFileレベルにおけるコード指標を表示させるために、左にあるツリーの中のアイテムを選択してください。
- Select an item from the combobox to further restrict the report to just forms, classes, public or private members, methods or properties, and so forth.
- レポートに制限させるために、フォーム、クラス、パブリックまたはプライベートのメンバ、メソッドやプロパティなどの項目をコンボボックスから選択します。
- Select an item in the grid to see a more detailed report in the lower area of the Metrics tab.
- 表の中の項目を選択すると、Metricsタブの下段にあるより詳細なレポートを見ることができます。
- Sort the items in the grid in either ascending or descending order, by clicking on a column header.
- 表の中の項目で列ヘッダをクリックすることで、各項目列の昇順、降順の並び替えをすることができます。
The sorting feature is especially useful when focusing on the most problematic portions of the VB6 solution to be converted. For example, you can sort all methods on their cyclomatic index in descending order to immediately find the most complex methods in the application.
ソート機能は変換されたVB6ソリューションで特に最も問題となる部分に焦点をおくように利用すると便利です。たとえば、アプリケーションの中で最も複雑なメソッドを見つけるために、「Cyclomatic Index」にあるすべてのメソッドを降順で並び替えることができます。
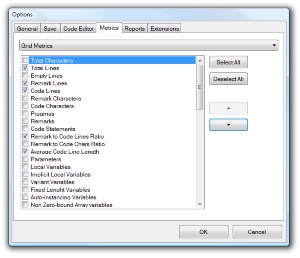
The Metrics tab of the Tools-Options dialog allows you to configure which code metrics appear in the grid and in the area underneath the grid.
「Tools -> Options」を実行し、Optionsダイアログの「Metrics」タブでグリッドの下にあるエリアにどのコード指標を表示させるか設定することができます。
The name of most code metrics values is self-explanatory, but a few might require an explanation.
ほとんどのコード統計値の名称は一目瞭然かと思いますが、いくつか説明をします。
- Total Lines is the sum of all code lines in the file, project, or solution. It includes the lines in the hidden portion of .frm and .ctl files.
Total LinesはFile、Project、Solutionのすべてのコード行の合計です。.frmと.ctlの隠れたコードも行数に含みます。
- Code Lines is the number of lines that contain actual executable code; it doesn’t include empty and remark lines (which are counted by separate code metrics).
- Code Linesは実際の実行コードを含むコード行数です。空行とコメント行は含みません。(分割したコード統計によりカウントされます)
- Remark to Code Lines Ratio provides a broad measure of how well the original VB6 project is documented; the higher this value, the better.
- Remarks to Code Lines RatioはオリジナルのVB6のドキュメントに記載されているものよりもより高く、より広範囲に測定したコード比率を提供します。
- Implicit Local Variables is the number of local variables that aren’t explicitly declared; they are typically converted as Object variables, therefore you might need to add the original VB6 code to use a more efficient type.
- Implicit Local Variablesは明示的に宣言されていないローカル変数の数です。それらは通常オブジェクト変数として変換されます。そのために、より効果的な型を使用するようにオリジナルのVB6コードに追加する必要があるかもしれません。
- Variant Variables is the number of Variant variables; they are migrated as Object variables, therefore it is recommend that you carefully scrutinize each of them and change them to a more efficient type if possible, or possibly use a SetType pragma to convert them to VB6Variant variables.
- Variant Variablesはバリアント型変数の数です。それらはオブジェクト変数として移行されます。そのために、それらをひとつひとつ注意深く精査し、より効果的な型に変えることを勧めます。できれば、VB6Variant変数にそれらを変換するようにSetType Pragmaを使用してみてください。
- Fixed Length Variables is the number of fixed-length strings. By default they are converted to instances of the VB6FixedLength class, but you might want to edit the original VB6 code (or use a UseSystemString pragma) to transform them into regular string.
- Fixed Length Variablesは固定長型変数の数です。デフォルトではそれらはVB6FixedLengthクラスのインスタンスに変換されます。しかし、通常のStringに変換するためにオリジナルのVB6コードを編集して下さい。(UseSystemString Pragmaを使うこともできます)
- Auto-Instancing Variables is the number of variables declared with the “As New” keyword. These variables have a different semantics in VB.NET and might behave differently.
- Auto-Instancing Variablesは「As New」キーワードで宣言されている変数の数です。これらの変数は、VB.NETでは異なる意味を持っており、違った動作をすることもあります。
- Non-Zero Bound Array Variables is the number of arrays whose lower index is nonzero; such arrays require a pragma to compile correctly under VB.NET.
- Non-Zero Bound Array Variablesは最小IndexがNon-Zeroの配列の数です。VB.NET配下でそのような配列を正しくコンパイルするためのPragmaが必要です。
- Gotos, Gosubs, On Gotos and Gosubs are the total number of GoTo keywords, GoSub keywords, and calculated GoTo/GoSub keywords, respectively. VB.NET supports the GoTo keyword and VB Migration Partner generates code that simulates GoSubs and calculated GoTo/GoSub; nevertheless, it is strongly recommended that you edit the original VB6 application to get rid of them.
- Gotos, Gosubs, On Gotos and GosubsはGotoキーワード、Gosubキーワード、計算されたGoTo/GoSubキーワードの合計数です。それぞれVB.NETはGoToキーワードをサポートし、VB Migration PartnerはシミュレートされたGoSubs、そして計算されたGoTo/GoSubをコード生成します。しかしながら、それらを除去するためにオリジナルのVB6コードを編集することを強く推奨します。
- On Errors and Resumes are the number of On Error statements and of Resume/Resume Next statements. VB.NET supports them, but you should replace them with more structured and efficient Try…Catch blocks.
- On Errors and ResumesはOn Errorステートメント、Resume/Resume Nextステートメントの数です。VB.NETはそれらをサポートします。しかし、より構造的かつ効果的にTry・・・Catchブロックに置き換えて下さい。
- File Operations is the number of Open, Get#, Put#, and other file-related statements. These keywords don’t behave in exactly the same way in VB6 and VB.NET and VB Migration Partner doesn’t automatically account for all these differences, therefore you might need to carefully test each of them.
- File OperationsはOpen、Get#、Put#、その他ファイル関連ステートメントの数です。これらのキーワードは、VB6とVB.NETではまったく同じ動作をするとは限りません。VB Migration Partnerはこれらの違いを自動的に把握するわけではないので、注意深くテストを十分に行う必要があります。
- Exit Points is the number of Exit Sub, Exit Function, and Exit Property keywords. This value is included in the code metrics report because many developers prefer to have a single exit point for each method.
- Exit PointsはExit Sub、Exit Function、Exit Propertyキーワードの数です。ほとんどの開発者はそれぞれのメソッドにひとつのExitがあることを好むために、この値をコード分析レポートに含めました。
- Cyclomatic Index is the number of all possible code execution paths in a method and is therefore equal to the number of tests that should be performed to prove that the method behaves correctly in all situations. When evaluated at the file, project, or solution level it returns the sum of cyclomatic index of all contained methods and therefore can be assumed as a broad measure of the overall complexity of that file, project, or solution.
- Cyclomatic Indexはメソッド内のすべてのコードが実行されるパスの数です。この数はすべての状況下でメソッドが正確に動作することを証明するために実行すべきテストの数とイコールになります。File、Project、Solutionレベルを評価するときに、すべての含まれたメソッドのサイクロマティック指数の合計を返します。したがって、File、Project、Solutionの広範な複雑性の測定として想定することができます。
- Nesting Level is the maximum nesting level of blocks inside a method. For example, a method that contains a For loop that contains an If block has a nesting level equal to 2. When evaluated at the file, project, or solution level it returns the sum of nesting level of all contained methods.
- Nesting Levelはメソッド内部のブロックのネストしているレベルの最大値です。たとえば、For Loopを含んだメソッドが含んでいるブロックをネストレベル2に相当します。File、Project、Solutionレベルを評価するときに、すべての含まれたメソッドのネストしているレベルの合計を返します。
- If Directives is the number of #If, #ElseIf, and #Else keywords. VB Migration Partner is capable to evaluate #If conditions and converts only the portion of code that is contained in the “true” portion of the #If block. All other sections must be converted manually, therefore it is a good idea to revise the original VB6 application and ensure that #If and #Const expressions exactly define the code that you want to convert.
If Directivesは#If、#ElseIf、#Elseキーワードの数です。VB Migration PartnerはIf条件を評価することができ、Ifブロックの“True”部分に含まれているコードの部分だけを変換します。その他すべてのセクションは手動による変換を行って下さい。オリジナルのVB6アプリケーションを修正し、#Ifと#Const表現で変換したいコードを正しく定義することで動作を保証します。 2.7 Using assessment features/評価機能を使用
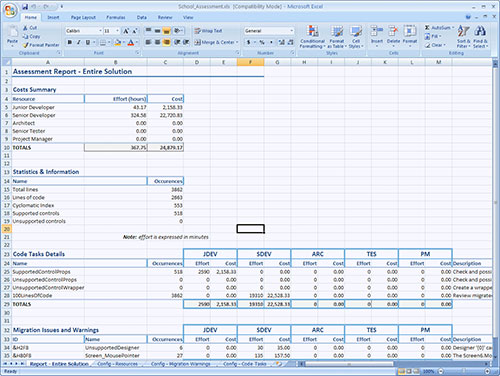
If the VB6 project has been already converted, VB Migration Partner can generate an assessment report and export it Microsoft Excel. The report contains detailed information about each project in the original application, including code metrics, number of migration issues and warnings, and an estimation of time (and money) required to complete the conversion process.
もしVB6プロジェクトが既に変換されているのであれば、VB Migration Partnerは評価レポートを生成し、Microsoft Excelにてエクスポートすることもできます。そのレポートはオリジナルアプリケーションのそれぞれのProjectについて詳細な情報を含みます。ほかにコード分析、移行の警告と問題の数、変換プロセスを完成させるに必要な見積時間(費用)などもレポートに含まれます。

Run the assessment feature by selecting the Tools-Generate Assessment Report menu command or by clicking on the Assessment toolbar button.
「Tools メニュー Generate Assessment Report」を実行するか、ツールバーの「Generate the assessment report」ボタンをクリックして評価機能を起動してください。
VB Migration Partner lets you select the name of the target Microsoft Excel file and then creates the assessment report. This step can take several seconds, or even minutes, for long and complex VB6 applications. At the end of the process a message box allows you to load the generated report inside Microsoft Excel.
VB Migration PartnerはMicrosoft Excelファイル名を指定し、評価レポートを生成します。この手順には長くて複雑なVB6アプリケーションでは数秒もしくは数分かかります。プロセスの最後に生成されたレポートをMicrosoft Excelに読み込ませるかどうかのメッセージボックスを表示します。
The first worksheet generated Microsoft Excel file provides a summary of estimated costs for the entire application. If the VB6 application contains two or more project, a separate worksheet is generated for each project.
生成されたMicrosoft Excelの最初のワークシートは、アプリケーション全体の費用見積合計を提供します。もしVB6アプリケーションが2つもしくはそれ以上のProjectを含んでいる場合は、ワークシートを分割し、それぞれのProject毎に生成します。
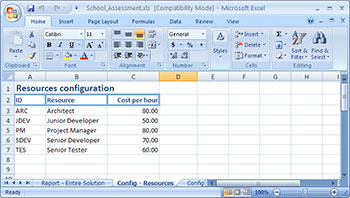
The “Config – Resources” worksheet allows you to define five different developer roles and assign a different hourly cost to each of them. The predefined roles are Project Manager, Architect, Junior Developer, Senior Developer, and Senior Tester, but you can change their name and cost as you see fit. (You can also add more roles, if you are an expert Microsoft Excel user.)
「Config – Resources」ワークシートは5つの異なった開発者の役割を定義し、それぞれに1時間あたりの費用を割り当てます。その所定の役割とは、プロジェクトマネージャー、設計者、中級レベル開発者、上級レベル開発者、上級レベルテスターです。それらの名前やコストは変更することができます。(Microsoft Excel エキスパートユーザであれば他の役割を追加することもできます。)
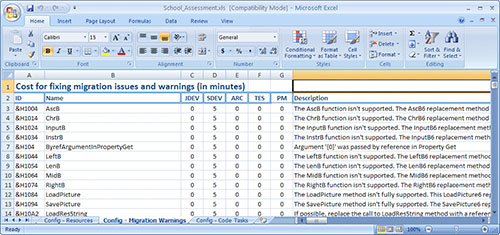
The “Config – Migration Warnings” worksheet is where you configure how many minutes it takes for each developer role to fix a given issue or warning message. Each message is identified by an obscure hexadecimal ID, but you can read its description in the rightmost column.
「Config – Migration Warnings」ワークシートはそれぞれの開発者役割が与えられた問題や警告メッセージを修正するのにどれくらいの時間(分)がかかるかを設定します。それぞれのメッセージは16進数の表記によるIDで識別されますが、右端の列の説明を読むことができます。
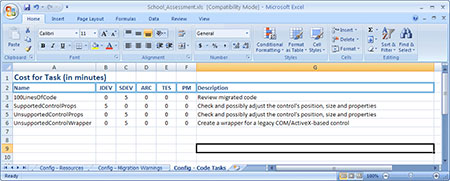
Finally, in the “Config – Code Tasks” you configure the duration (in minutes) for tasks that aren’t related to specific migration error and warning messages – for example, the time required to check 100 lines of code to ensure that they have been migrated correctly.
最後の「Config – Code Tasks」ワークシートは仕様的な移行の問題や、警告メッセージに関連しないタスクにかかる時間(分)を設定します。たとえば、正しく移行されたのを保証するために100行のコードをチェックするのに要求される時間。
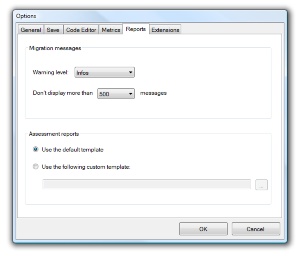
After configuring a report according to your preferences, you should save it to a different Microsoft Excel file, so that you can reuse it as a template for subsequent assessments – either for the same or a different VB6 project. You select which template should be used in the Assessment Report tab of the Tools-Options dialog box.
好みに応じたレポートの設定の後で、異なったMicrosoft Excelファイルを保存してください。同じProjectや別のVB6Projectの次回の評価のためのテンプレートとして再利用することができます。「Tools メニュー Options」のダイアログのReportsタブでどのテンプレートをデフォルトで使うかを指定することができます。
2.8 Customizing the code window/コードWindowのカスタマイズ
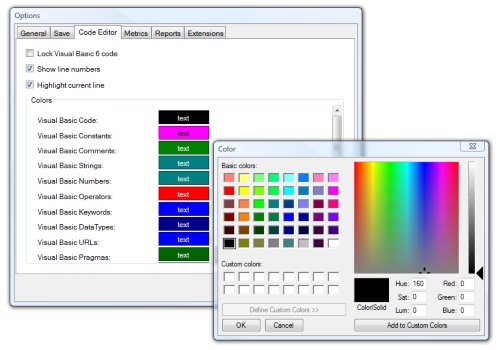
You can customize the colors used by the VB6 and VB.NET code windows from inside the Code Editor tab in the Tool-Options dialog box.
「Tools -> Options」のダイアログのCode EditorタブでVB6とVB.NETのコードWindowで使われる色をカスタマイズすることができます。


